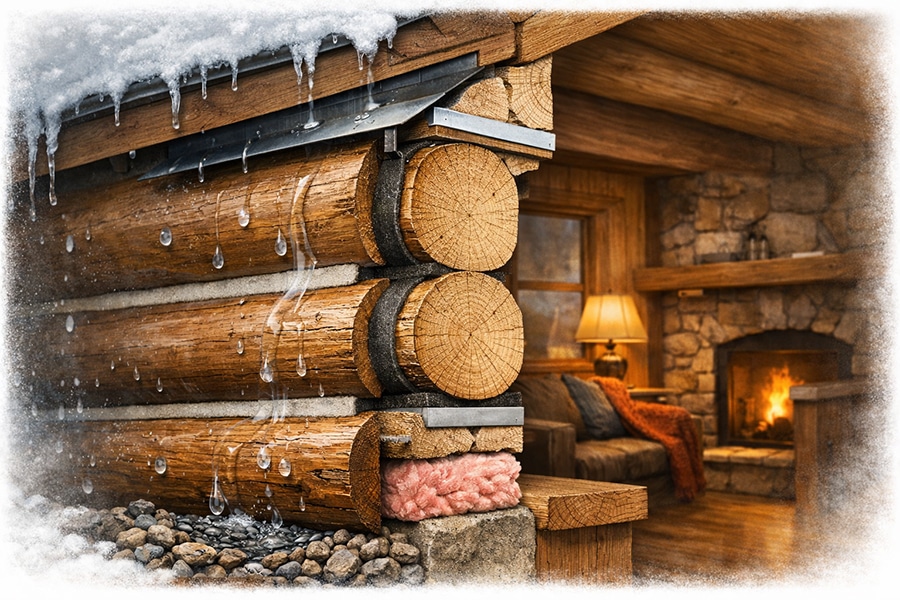
Water caused more damage to log homes than almost anything else. In East Tennessee, moisture showed up in many forms — steady rain, heavy humidity, melting snow, foggy mornings, and splashback from the ground. None of it looked dramatic at first. The trouble came when moisture stayed where it didn’t belong. Left alone, it softened logs, loosened fasteners, compromised chinking, and shortened the life of an otherwise solid home.
At East Tennessee Building Supply, moisture problems became visible in February. Winter freezes expose weak drainage. Ice melt revealed where water traveled. Spring rains were right around the corner. This was the moment to address minor issues before they became major repairs.
How Water Actually Damages Log Homes
Logs were strong, but they were still wood. When moisture remained in contact too long, it slowly worked its way in.
Water caused problems by:
Seeping into joints and seams
Sitting against lower log courses
Freezing and expanding in winter
Trapping moisture behind stains or sealants
Feeding mildew and rot
Most moisture damage didn’t start with a flood. It started with small, repeated exposure.
Ground Moisture: The Most Overlooked Threat
The ground around the home caused more issues than rain from above.
Common Ground-Related Problems
Soil sloping toward the house
Splashback during heavy rain
Snow piled against the walls
Mulch or landscaping touching logs
Poor drainage in low areas
Lower logs stayed damp longer than upper courses. Over time, that moisture worked upward. Even well-stained logs couldn’t fight standing water forever.
Smart Ground Management
Keep soil sloped away from the foundation
Maintain a clear space between logs and the ground
Use gravel beds to reduce splashback
Avoid piling snow against the walls
These steps alone prevented a surprising amount of damage.
Rooflines, Gutters, and Drip Zones
Water followed gravity. Rooflines determined where it landed.
Problem Areas to Inspect
Gutter overflow during freezes
Ice dams at the roof edges
Missing or loose flashing
Short overhangs above log walls
Water streaks below eaves
When gutters clogged or froze, water spilled directly onto the logs below. That repeated soaking stressed the wood and accelerated the fading of the stain compared to normal weather exposure.
Properly pitched gutters, clean downspouts, and well-placed flashing kept water moving away from the structure.
Windows, Doors, and Penetrations
Every opening in a log wall was a potential entry point.
Watch For
Water staining around the trim
Caulk is separating at the seams
Soft wood near frames
Condensation inside during cold weather
Moisture around openings often went unnoticed because the trim hid the early signs. February was a good time to check while the damage was still minimal.
Using flexible sealants and foam tape allowed the wall to move without opening gaps that let water in.
Chinking and Moisture Control
Chinking wasn’t just cosmetic. It played a key role in moisture management.
When chinking failed:
Water entered log joints
Air leaks increased
Logs dried unevenly
Freeze-thaw cycles worsened damage
Proper chinking flexed with the logs and sealed joints without trapping moisture. Repairs made early in the year held up better through spring rains.
Stain Failure Often Signals Moisture Issues
Peeling, blistering, or darkened stain areas usually indicate water problems beneath.
Common causes included:
Water running down the wall repeatedly
Trapped moisture behind non-breathable finishes
Logs staying wet too long due to shade or poor airflow
A failing stain wasn’t just a finish issue. It was a warning sign.
Interior Clues You Shouldn’t Ignore
Moisture problems often showed up inside first.
Interior Red Flags
Musty smells
Cold, damp spots on walls
Condensation on windows
Increased heating costs
Mold in corners or behind furniture
These signs suggested moisture migration through the wall system. Addressing the exterior source was the real solution.
Why February Is the Right Time to Act
By February:
Winter moisture patterns were visible
Freeze damage had revealed weak points
Spring rain hadn’t started yet
Fixes made now held up better and were easier to complete before busy spring schedules.
Practical Moisture-Management Tools
Effective moisture control relied on a combination of materials and planning.
Key tools included:
Proper flashing
Quality sealants
Foam tape and gaskets
Breathable stains
Good drainage practices
At East Tennessee Building Supply, we helped homeowners match the right materials to the specific moisture challenges of their property.
A Familiar East Tennessee Scenario
A cabin owner near Erwin noticed dark streaks below his gutters every winter. The logs looked stained, but the real issue was frozen gutters dumping water repeatedly in the same spot. Once the gutter slope was corrected and flashing added, the logs dried properly and the stain stabilized.
Some East Tennessee Trivia
Early mountain cabins were often built on stone piers to lift logs off the ground and away from ground moisture. That simple elevation extended the life of many historic homes by decades.
Moisture was the most persistent threat to log homes in East Tennessee. It worked quietly and caused damage over time. Managing ground drainage, roof runoff, openings, chinking, and finishes kept water where it belonged — outside. With early inspections and the right materials from East Tennessee Building Supply, homeowners protected their cabins and avoided costly repairs before spring arrived.